Telegram Messenger
The following steps give you an overview of the steps necessary to create a bot with the Telegram BotFather. Since the user interface of the Telegram BotFather is regularly subject to change, the following steps are not entitlement to completeness or accurateness. However, we update the documentation on a regular basis and look forward to your hints.
- Brief overview: The installation takes place in multiple steps:
- Create a new bot account with the Telegram BotFather
- Create a new bot account on the Business Bot platform
- Set Webhook for the Telegram Bot
Step 1: Create a new bot account with the Telegram BotFather
The BotFather is a Bot provided by Telegram to manage bot accounts. The BotFather is accessible using the Telegram Messenger app.
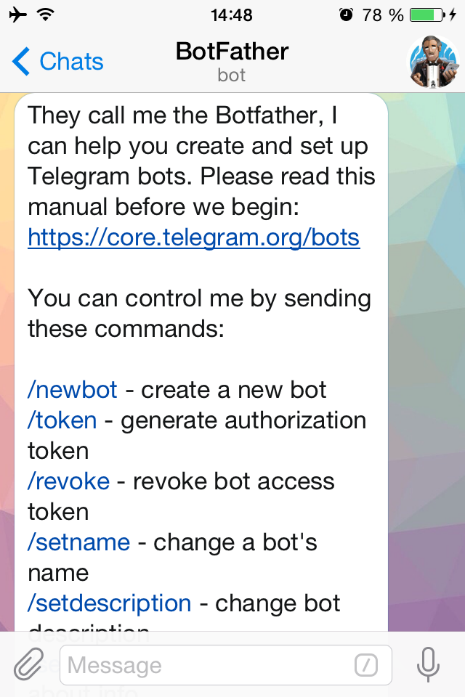
It is assumed that the Telegram app is already installed on the mobile terminal (e.g., smartphone or tablet).
- To communicate with the BotFather, open the browser on the mobile device and call the URL: tg://resolve?domain=BotFather
- The Telegram app with the BotFather chat is displayed
- Send the following message to the BotFather to create a bot user account:
/newbot- Subsequently, you give a name for the bot (Name must be end with
Bot), e.g.:MyTLBot- If the bot name has not already been assigned, then bot has been successfully created and the bot token is displayed to access the HTTP API, e.g.:
89797779:AKJKLujfeijJIoIlkkLIOI(Token consists of 31 characters)
Step 2: Create a new bot account on the Business Bot platform
- Firstly, login to the Business Bot Platform
- Choose
Chatbot Administration->Instant Messenger Accounts->Create Bot Account. The following data is required to create the bot account:
| Field | Example value |
|---|---|
| Name: | MyTLBotKonto |
| Description: | BotKonto for department Z |
| Instant Messenger: | Telegram |
- The bot account has been created and must still be configured with the instant messenger account information. To do this, click on the icon
Settingsand modify the following parameters:
| Required Fields | Description | Example value |
|---|---|---|
| Telegram.Bot.BotToken | Provided by Telegram | 8979:AKJKLulkkLIOI |
| Telegram.Bot.Username | Botname used during registration | MyTLBot (Optional) |
| Messenger.WebhookId | This Webhook ID is unique and is generated by the Business Bot platform (e.g. https://demo.mmgw.de/bbp/webhook/<webhook id>) | 42da2023-0187-4ab7-94ec-c843153bb36a |
The user account for the bot is now configured and will be used later when creating a bot instance for the Telegram Messenger.
Step 3: Set Webhook for the Telegram Bot
Next we need to get those messages forwarding to the Business Bot Platform. We’re not going to use getUpdates, because it’s outdated and inefficient. Only for specific use cases, you can still use it on the Business Bot Platform. Thankfully, there’s a better method, and that’s setWebhook.
The only issue with setWebhook is that Telegram requires that your Business Bot Platform uses SSL, in other words, that your Business Bot Platform has a certificate and can correctly be visited via https://mysuffix.mmgw.de/.
Thankfully, as of August 2015, Telegram allows you to sign your own certificate, which cuts out the costly factor of buying one. On the down side, you can submit that certificate to them when you set up the webhook. If your Business Bot Platform is using https, then it’s fine to provide Telegram only the webhook address of this platform. Providing the own public certificate to Telegram represent an extra of security in messaging delivery (check certificate first, then deliver the message).
Step 1 (Optional): Create your cert and set up your Business Bot Platform to use it.
Note
The Telegram Messenger accepts only secure connections (HTTPS), therefore the Business Bot platform with webhook must be reachable on an SSL-enabled server. HTTP is not supported by Telegram Messenger. This step is optional, when you already access the Business Bot Platform using https address.
Digital Ocean have an excellent and easy to follow tutorial here (https://www.digitalocean.com/community/tutorials/how-to-create-an-ssl-certificate-on-nginx-for-ubuntu-14-04) if your Business Bot Platform is hosted using nginx. One amendment for the purposes of Telegram bots is that the tutorial states that you can use your site domain or the IP address of your server. However, the IP address will not work with the bot webhook. You have to use the domain where your Business Bot Platform will be hosted.
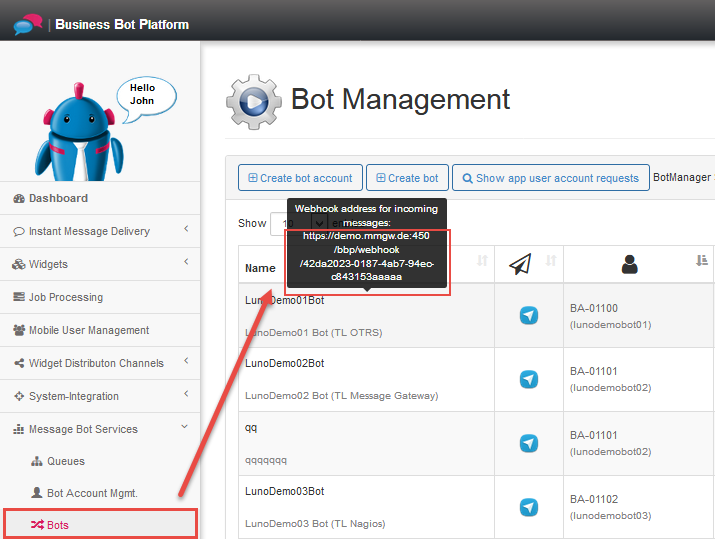
Step 2: Identify the webhook address on the Business Bot Platform
To do this, login to the Business Bot Platform, navigate to Chatbot Administration -> Chatbots, then move with your mouse cursor over the bot name to display the webhook address of the bot.
Step 3 (for Windows without submitting public certificate to Telegram): Set up the webhook using the browser
Setup the webhook for Telegram (without submitting the public certificate of the Business Bot Platform to Telegram) is pretty easy, because you can do everything in your browser. Just open the web browser and submit the corresponding url. Firstly, we check if a webhook for your bot is set -or- not. Secondly, we set the webhook address, and lastly we query the webhook status. Therefore, you have to submit follow urls below:
1 2 3 4 5 6 7 8 9 10 11 12 13 14 15 16 17 18 19 20 21 | 1. GetWebhookInfo: When webhook was not set:
URL syntax: https://api.telegram.org/bot<Bot Token>/getwebhookinfo
URL example: https://api.telegram.org/bot261992120:AAE2DkORBm3G_T8t0DZGvE5_CCCCCCCCCCC/getwebhookinfo
Result: {"ok":true,"result":{"url":"","has_custom_certificate":false,"pending_update_count":0}}
2. SetWebhook: Set the webhook address to the Business Bot Platform
URL syntax: https://api.telegram.org/bot<Bot Token>/setWebhook?url=<Business Bot Platform Webhook Address>
URL example: https://api.telegram.org/bot261992120:AAE2DkORBm3G_T8t0DZGvE5_CCCCCCCCCCC/setWebhook?url=https://my.mmgw.de/bbp/webhook/42da2023-0187-4ab7-94ec-c843153aaaaa
Result: {"ok":true,"result":true,"description":"Webhook was set"}
3. GetWebhookInfo: Verify the webhook address on the Telegram server
When webhook has been set, then result is:
URL syntax: https://api.telegram.org/bot<Bot Token>/getwebhookinfo
URL example: https://api.telegram.org/bot261992120:AAE2DkORBm3G_T8t0DZGvE5_CCCCCCCCCCC/getwebhookinfo
Result: {"ok":true,"result":{"url":"https://my.mmgw.de/bbp/webhook/42da2023-0187-4ab7-94ec-c843153aaaaa","has_custom_certificate":false,"pending_update_count":0,"max_connections":40}}
-------- Optional url commands --------
Delete a webhook (to use getUpdate polling method -or- setup a new webhook address)
URL syntax: https://api.telegram.org/bot<Bot Token>/setWebhook?url=
URL example: https://api.telegram.org/bot261992120:AAE2DkORBm3G_T8t0DZGvE5_CCCCCCCCCCC/setWebhook?url=
Result: {"ok":true,"result":true,"description":"Webhook was deleted"}
|

Step 3 (for Linux with submitting certificate to Telegram): Set up the Webhook on the Linux command line
If your Business Bot Platform is already signed (have a certificate), then you can use the URL method to set up the webhook. However, if you’ve self signed your certificate, you’ll need to upload your certificate as a file, and telegram wont accept this with the URL method as a string! Thankfully, this process is simple thanks to the Linux command line. In a terminal, type:
The generic syntax is:
1 | curl -F "url=https://mysuffix.mmgw.de/bbp/webhook/<webhook ID>" -F "certificate=@</location/of/cert>/<myCertificate.crt>" https://api.telegram.org/bot<Telegram Bot Token Id>/setWebhook
|
Working example:
1 | curl -F "url=https://mysuffix.mmgw.de/bbp/webhook/42da2023-0187-4ab7-94ec-c843153aaaaa" -F "certificate=@/location/of/cert/nginx.crt" https://api.telegram.org/bot000000000:AAAAa0aAA_aaA-Aaaa0A0Aa_a0aa0A0AAAA/setWebhook
|
The given url represents the bot webhook address provided by the Business Bot Platform. The certificate should point to nginx.crt (which is what it was named in the Digital Ocean tutorial). The final URL is calling the Telegram method setWebhook on your bot token. The webhook configuration is now complete. You wont be able to call the getUpdates method anymore, as the webhook will block it and only one method can be activated for operation.
We’ve set up the webhook, looked at how to call some of it’s methods, and most importantly the webhook on the Business Bot Platform is up and running. Therefore, just start the Bot.